I took a little bit of time this week to check out Screencastify as a content creation tool.
I chose this because I am already using a number of GAFE in my classroom and the school that I work with uses Chromebooks. When I heard that Screencastify was a Chrome extension option, I wanted to check it out in hopes that I could learn a bit more to start integrating it in my own classroom right away.
Plus/Minus
Plus – Easily Available – If you use Chrome, it’s simple to add it to your browser with only a few permission options to go through. It is also available for any device that uses Chrome, so that includes laptop browsers and (I believe) tablets. Once installed, it shows up as a small icon on the top of your browser window, ready for whenever you need to use it.
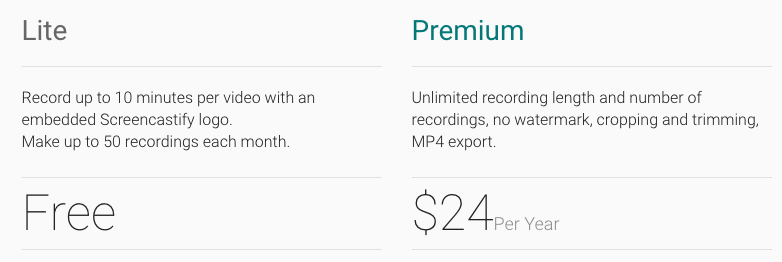
Plus – Free! (or pretty darn close) – There are a couple versions: the Lite (aka free) and Premium. The Lite version is very practical and will do everything you need it to do. It allows 50 videos…per month! That seems like a lot, but if you are willing to cough up the $2/ month for the premium, you won’t even have to worry about it.
 (from https://www.screencastify.com)
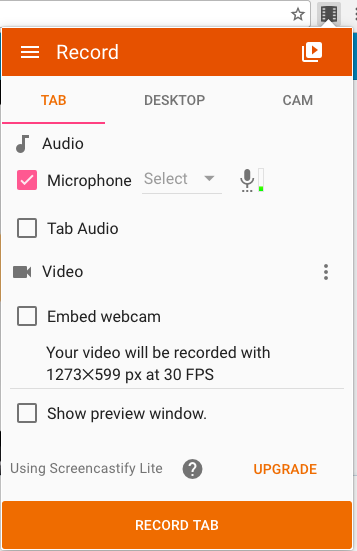
Plus – Easy to Use (like…really easy) – Click the icon. Click record. Countdown from 3. Start your screencast. You can narrate and show what you want to on the screen with the mouse. There is a small tool bar that appears at the bottom (ALT + T if you want to hide/show it) that has pen and eraser tools. Need to pause? Press the pause button. Finished? Press the icon and click the stop recording. Easy.
Plus – Online Exporting – Once you click stop recording, the video is automatically sent to your desktop or your Drive folder (you can select which one). It is a really nice option to have, instead of having video files pile up on your computer hard drive. It also makes them very easy to share. Nice touch.
Plus – Great for a Screencast – This tool is exactly what you need for a screencast type of content creation. It is a great way to explain simple concepts, instructions, or lessons. It records voice through the mic and records video. You can choose to record the internet tab, the desktop, or even record through the webcam itself (which could even branch off into a vlog tool). It has tools for pointing out important things and a handy ‘clear all’ button to get back to the original screen. I think there is a certain time, place, and purpose for screencasts, and this app is a perfect fit.
Minus – 10 minutes – The free version only lets you record for 10 minutes per video. A way around this, if you need more time, is to divide what you are teaching into parts or make it shorter.
Minus – The Lite Version – If you want to get down to it, there are a few nice things about upgrading. The Premium has trimming and cropping tools right in the app, so you can make small adjustments to your screencast without another editing software. It also gets rid of the Screencastify watermark. I think the most important feature that premium gets you (other than unlimited recordings) is the option to export in MP4 format. I talk about this in more detail later on.
Minus – The Drawing Tools – I may be grasping a bit for some ‘minuses’ in this review, but I found that the drawing tools were a bit awkward to use.
Minus – No Highlighter! – Maybe I am just picky, but I really like a good highlighter. Not just a spotlight, an actual highlighter pen tool. I feel like this would be useful to show links, words, etc.
Minus (kinda) – WebM format default – One thing I don’t like about this app is that it automatically formats the recording videos in a .webm format. Now, if you are using this for sharing online with Drive, Classroom, or YouTube, it is not a problem. It is also not a problem if you are okay with unpolished, raw screencasts, which is fine. However, if you want to edit your screencasts, you will need to use editing software, which does not work well with the .webm video format. What that means is you will have to find a third party video converter (either downloaded or online) in order to convert the file. This is a little bit cumbersome. However, I was able to find a screencast that explains a bit of a backdoor way to get your video into an MP4 format, which is the most common video file format and much more compatible. It is a neat trick and easy to use for the odd time you need an MP4 version.
Minus – The screencast video that I found mentioned above – My next goal is to remake this screencast.
Plus – Student Friendly (Isn’t this the point of all of this stuff anyway?) – All of the positives mentioned above translate so well to student control. Yes, this tool is a great way for teachers to use screencasts to improve instruction and make it more accessible, but we can’t overlook its glaring potential for student use. Check out this blog post for a list of different ideas for using Screencastify in your classroom.
I am really looking forward to using this tool. I think its simplicity and practicality make it very easy to integrate and start using right away. I also want to look at more ways I can use it for student projects and assessment.
Thanks for reading.

Great post Graham. Very practical and easy to follow. Not sure if I’ll be using any Screencast for my project, but if I am, I will be reading your blog post again!
LikeLike
Very good post Graham! I have used screencastify and screencastomatic. It sounds like it may be worth spending the money to have the Premium options.
LikeLike
Great post! Good to know that you liked it and it’s an easy tool to use. I love that you mentioned the highlighter. I also agree that a highlighter is an important screen cast tool. I also think it’s a good way to model how to find and highlight important points which is a good skill for students later on!
LikeLike
Great post Graham. Our school has Chromebooks too, so it is nice that this will work with them. I will be checking out that blog to see how I can use this with my students. Thanks!
LikeLike
Great post!
LikeLike
Thanks for the post, Graham. I like screencasting tools especially for recording content when kids are absent. I haven’t ever used them with my students – should try that. Thanks for the groovy song at the end!
LikeLike